Shigefusa 270mm kasumi yanagiba with custom, by me, desert ironwood handle

Labels

Stones (15) Knives (10) Sharpening (10) Review (9) Test (9) Knife building (7) Knife handles (7) Refurbishment (5) Pimp My Knife (3) Food (2) Saya (2) The Black Pearl (1)
Showing posts with label Knife handles. Show all posts

24 Apr 2012

Full custom 300 mm damascus san mai suji - "The Black Pearl"

About a year ago I was thinking seriously about getting a full custom knife. I was not sure where I wanted to go so I searched the Internet, different knifeforums and several knifemakers' web pages. There was a plentitude of options. Some of them totally not my liking and others so costly I would have to sell my car and a kidney to get one, so quite a few options were ruled out pretty easily.

After a lot of searching I found exactly the design I was looking for in a blade. Problem was it was not a kitchen knife. It was a hunter blade. Fully forged high contrast damascus with an O1 core. The blade was absolutely stunning! By this time I had pretty much settled my mind for a sujihiki blade to complement my collection of yanagibas, and I wanted to stick to the 300 mm length as this is the length I have been accustomed to in my slicers.

I contacted the knifemaker of the above mentioned hunter, and we started talking. He was all ears about my requests and baseline design suggestions, filling me in on the gaps and finally he came up with an idea so grand I could not resist. A 300 mm sujihiki with O1 core steel encapsulated in pure nickel and direct forged in a high contrast damascus of 15N20 and 1084 steel. In this particular blade the core steel is forged directly into the centre of the damascus bar. This is a very time consuming and an immensely difficult task to accomplish, especially in a 300 mm blade, as it is almost impossible to keep the core straight and in the centre of the blade during the forging process. This was going to be a grand test of his skills as a blacksmith.

You can see the core steel gently rippling down the centre of the spine of the blade with the nickel encapsulating the core.
After one single trial run, resulting in the worlds probably most exclusive letter opener :o), he succeeded. That is nothing less than impressive, and a proof of exceptional skill as a knifemaker.

The result ended up like this. I just can't stop looking at it. It is an exceptional piece of functional art. It looks pretty hefty, but actually, the first thing my wife said when she took it up was "Wow, it's a lot lighter than it looks!". I have to agree with her on that one. It is definately not the lightest suji out there, but the balance, the forged tapering of the blade and the weight and shape of the handle is so well executed that the knife immediately feels like an extention to your hand.
"The Black Pearl" in all its' splendour with the stunning Stingray saya. It is truly a one-of-a-kind knife
Most of you will recognize the brand mark on the certificate. The Bear paw. Many of you will also recognize the special rounded choil and the full grain leather saya design. The blacksmith and knifemaker is of course Mr. Pierre Rodrigue from Canada. A true master of his craft and a true gentleman to his trade.
The Bear paw of Mr Rodrigue's brand. Look also at the incredible damascus pattern.
Remember that the damascus pattern is forged with the core in. That is pretty impressive stuff!
Total production time was about one year from start to finish. The extensive production time was partly because Mr. Rodrigue is a very busy man and a popular knifemaker, partly because the forging of the blade is an exceedingly complex matter, partly because some of the materials used are pretty long lead items and partly because this project was not one to be taken lightly, not by Mr. Rodrigue nor by me. It was to be a masterpiece. A Piece de resistance. A signature design. Mission accomplished!
"The Black Pearl" is number 124 in the production line.
Sum up the numbers and you'll get lucky number 7.
Coincidence? I think not! :o)
Our frequent conversations on the different design issues, material choises, challenges and new ideas gave me an ownership in the project I have never before experienced. It felt almost like I was there with Mr. Rodrigue designing my own knife. Truth is I didn't want it to end. Well, on the one hand I could not wait to see and experience the finished knife, but on the other hand I found so much fun, joy and excitement in the discussions with Mr Rodrigue that I wanted the project to go on.
Every now and then he would tell me about ideas he had that he wanted my opinions on and other times he told me that he had surprises coming that he didn't want to disclose. This kept the excitement and thrill in this for me all the way.
The black burl handle perfectly matching the knife
On one occasion we were discussing handle design and materials, I told him I would like some black burl to match the black blade, and Mr. Rodrigue suggested he could accentuate the handle with black Mother of Pearl shell. I was thrilled by the idea and in a fraction of a second the obvious name of the knife popped into my head. The knife had been named "The Black Pearl".

"Fifteen men on a dead mans chest. Yo, ho ho, and a bottle of Rhum!" :o)

The black Mother of Pearl inlay giving the knfe its' true name
The greatest and best kept secret was the final design of the saya. To go with the maritime theme of "The Black Pearl", Mr. Rodrigue has designed the saya with jet black Stingray skin keeping the natural snow white "diamond" in the skin in the centre. I tried to imagine what the secret could be, but honestly, I did not see that one coming. The first time I laid my eyes on it I was totally stunned by its beauty. The Stingray skin looks like millions of tiny black shiny pearls glued together on the saya with the beautiful diamond shape in slightly larger white pearls. It is an amazing feature which makes the knife even more spectacular (if at all possible).

As if all this wasn't enough, Mr. Rodrigue suggested one more thing. He was really twisting his clever brains on how to add another design feature to the handle butt to pimp it up the last final bit without making it look cheesy. That alone is no simple task on an already extreme knife like this. To me it was no surprise he found a great solution. "How about mounting a small Ammonite?" he asked me. "An ammo...what?" I asked. "An Ammonite is a fossil shell from an extinct squid, some millions of years old", he told me. "Really nice." he finished. I agreed without really knowing what an ammonite was and how it was looking. At this moment in the process I had come to trust Mr. Rodrigue's sense of design pretty blindly.
Ammonite. MY Ammonite! 'Nuff said.
I was stunned when I saw it the first time. It is alost translucent and three dimensional, changing colours from rust red to a deep green through blueish tones and with a bright metallic sheen to it. It is an absolutely magnificent little gem. The above picture was the best I could get. Turn the Ammonite some degrees and you will get a totally different appearance. I really don't know what more to say about it. I am just really glad that it is there.

This knife stands out as an absolutely perfect example on how all the small pieces of a design add up to something a lot more than the sum of its' parts. It's like an expensive car or an expensive watch. It gives you that special feel and its' quality is instantly recognized. A very important difference, however, is that this magnificent blade has not only one, but two souls in it. A large chunk which is from Mr. Rodrigue, and I feel he has succeeded to incorporate a good piece of my heart and soul as well. I can feel that when I am holding the knife. It is like closing my eyes, imagining the perfect knife in my hand and when I open my eyes "The Black Pearl" is there.

So, it takes a while, and it is not cheap, and if you rather want a good main stream knife quickly without paying a lot, call one of the several good shops importing Japanese blades and selling pre made blades from good makers. Ask someone at Kitchenknifeforums.com or Knifeforums.com. A lot of good guys there that will be more than happy to help you out.
For me, a good knife quickly was not what I was looking for (this time). I have all that I can use and more of that kind. I wanted to go full custom and to be able to interact, or at least contribute in the making even though I was an ocean away. Did I get it? Yes, yes, and more so. I have gotten the knife of my dreams through this joint venture with Mr Rodrigue. His exeptional skills as a knifemaker and his ability to put some of my more or less quirky whishes and ideas to life made this happen.
But no matter how much i treasure "The Black Pearl", the most surprising and valuable thing that came out of this adventure was the forging of a good friendship. I am very greatful and proud to be able to call Pierre Rodrigue my friend. If you want an exciting knife making journey getting to know a true gentleman and one of the very best knifemakers out there, and a magnificent one-of-a-kind knife to top the whole thing off, send him a note.

My next whish is to be able to sit with Mr. Rodrigue in his back yard some day. Talk knives, drinking cold beers and slice a perfect BBQ roast for dinner with "The Black Pearl". That would be going full circle to me.

DarKHOeK

Up next: Captain of "The Black Pearl" - The user experience


19 Dec 2011

Petty and Victorinox rehandle

This is what I have been working on lately. My friend Øivind had a couple of knives he wanted me to rehandle and I needed at couple of "easy" projects to keep me going. I have a couple of ongoing project that really challenge my skills. One of them is the Hiromoto sujihiki rehandle and saya in a previous post. The other is a Keijiro Doi Shiro Kengata Hayate that will get a new handle, a matching saya and a matching pair of moribashi, but more on that in a later post.

Now, on to the rehandle projects.

I have done a "pimp my Vic" for Øivind before, and the petty was a very nice little damascus blade with a western full tang handle that he wanted me to makeinto a hidden tang with a little more palm swell to fit Øivinds largeish hands.

I didn't actually make WIP of these knives as I kind of lost the "spark" after the mess over at KKF. It just tore me apart. Hope to be back with more elaborate posts after this one.

Anyways here is a couple of pictures of the finished knives. Sorry for the crappy shots, but the lighting was not the best and the blitz on the camera really does more harm than good in this kind og photography so I had to manage without it. I hope that Øivind is pleased with his knives.

The petty got a handle from stabilized Redwood burl from Burl Source. Thanks again Mark for excellent stuff. The saya is also from redwood burl but unstabilized. The handle spacer and end cap as well as the saya pin is from Musk ox forhead. Hey, it's Christmas! :o)


The handle on the Victorinox is from a two tone brown dyed maple burl from Burl Source also. Mark, you just blow me away with all that spectacular wood. Three 1,5mm pins from nickel silver and a file worked spine on the tang. Handle is glued up with black epoxy to better show off the file work.


Thanks for looking.

Harald.

14 Nov 2011

Handle and saya on Hiromoto sujihiki


A great sushi Chef in New York sent me a Hiromoto sujihiki blade with a block of stabilized spalted Hackberry wood that he wanted to have made into a handle. He also requested me to build a matching saya for the handle, but as soon as I saw the handle block I new I was in for a real challenge. The handle block is one of the most dramatic pieces of wood I have ever seen, and judging from the weight of the block it must have come a long way in the deteriorating process so allowing the stabilizing liquid to really soak through the wood. Challenge was to find wood for the saya that was not stabilized but still solid and spalted or figured enough to match the handle.

The blade is a Hiromoto san mai kasumi sujihiki wich has been etched (by Dave Martell?) to bring out the dramatic lamination line between the core steel and the soft cladding. The cladding had gotten an almost shimmering surface from the etching which stood in great contrast to the almost black core steel. My first thought looking at the blade and the handle block was that this would going to be one dramatic looking knife when finished.

Spalted hackberry wood - stabilized block, and the old handle
As soon as I started working on the handle block it soon became very clear to me that I was in for another challenge. The wood was so hard and dense that I had a really hard time working it. Both cutting, sanding and grinding was a really tedious process and it ate my sanding paper like it was made of wet newspaper. What was this wood anyway, petrified? Stabilized with shot proof glass?

Searching through my stock of different horn material I found a really nice marbeled piece of cow horn with dark and tan stripes that would match up really nice with the colors of the handle. After working out all the pieces and sorting out the order of which to put them I was finally ready to glue everything up. I have found this a good way to do it as I do not have the time to think and fiddle around when glueing things up. The worst things that can happen in this stage is that the glue starts to harden in the middle of the process so that everything is glued up with skews and voids all over the place. You might be able to salvage the wood but all bolsters and spacers will be heading for the bin.
All handle parts lined up and ready for assembly

  
All parts glued in with epoxy glue


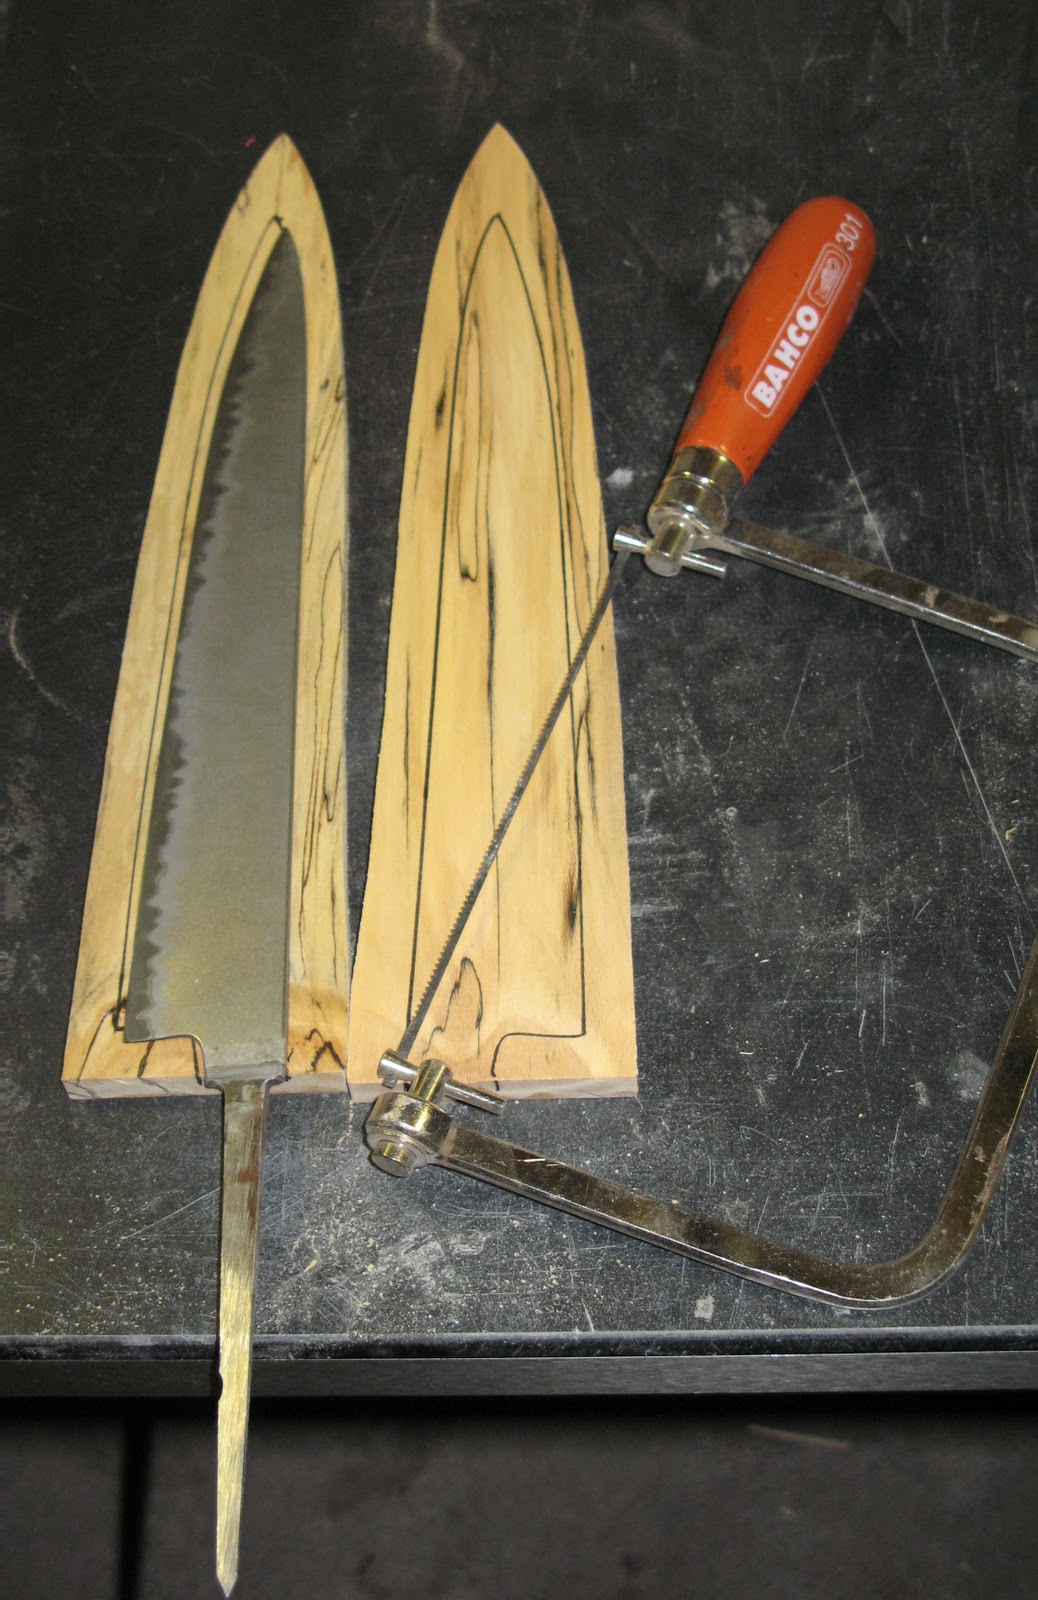
While the handle was curing I could start working on the saya. I had gotten a nice piece of spalted Sycamore thin lumber that was still all solid. It was sold as luthier wood, but it was perfect for saya material. After outlining the shape of the blade on the wood I cut out the pieces with the necessary extra space around for glueing and shaping. As the ink line was just on the surface of the wood I had to grind down the pieces to about the right thickness from the side going to be the inside of the saya. If I had done all the grinding of the saya after glueing I would risk to remove all of the beautiful inkline from the wood.
Outlining the saya on the spalted Sycamore
Profiles sawn out slightly oversized


So, with the coarse shaping done I could start working out the cavities in the saya to fit the blade. The cavities should be as small and evenly shaped as possible without clamping the blade, and it is wise to make a 2-3 extra mm of space for the tip of the blade so the saya will not break it off if the saya is dropped when the knife is inside. The cavity along the edge should be as even as possible to protect the edge by distributing the pressure of the edge along the whole length of the saya if you get impacts to the saya with the knife in and pin out. Bumps along the edge line inside the saya can easily chip your blade.


Carving the cavities for the blade - Baby steps!!
 
Regularly checking the fit


Drilling and carving the tang hole in the handle gave me my next challenge as the wood clogged my drillbits every 2-3mm of drilling even if I was using a hand drill and going really slow. The clogging seemed to harden instantly like super glue in the cavities of my drillbits making them almost impossible to clean up. It took ages to drill two small holes for the depth of the tang. The rest was done pretty efficiently using a tiny square rasp and a very narrow saw that I have modified for this special task.  
Getting ready to drill the tang hole


Tang hole finally done


After shaping the saya and handle I was now ready to fit it all together. The saya was too light colored to match the handle so I dyed it with a spirit based wood dye. After some tests on a piece of saya wood I found mixing two parts "grey oak" to one part "red mahogany" would do the trick. After the dye had dried up I sanded down the saya with #800 paper until I got just the right color. Then I saturated the surface of the saya in Danish oil which gave me the exact color and hue I was looking for. After 48 hrs of letting the Danish oil harden, I gave the saya a final buffing with a wax based wood polish to give it a nice and silky shine.

All parts finally ready for assembly - Note the very light wood in the saya

Next up was to glue the blade in place. I had made the tang hole very slightly oversized to be able to micro adjust the handle on the blade. I wanted to give the handle a 1-2 degree lift related to the blade to make it more comfortable to use over time.

All taped up and ready for assmbly


Handle glued in place


Even if I had a really hard time working the material for the handle, this was one of my most rewarding projects ever. Before I started I feared that the heavy handle material would throw off the balance of the knife, but it came out perfect with a balance point just under 1" in front of the handle. The handle wood is some of the most spectacular wood I have ever seen and it really accentuates the dramatic lamination line of the etched blade. I was pretty happy with how the saya turned out as well to be honest. To pimp it all off I made a matching pin for the saya using the same marbeled horn as I used for the bolsters. Note the dark stripe in the pin matching up with the ink line in the saya :o)


Well, that's all, folks. Thank you for reading. I am happy for any comments and suggestions to my work as usual, as your comments is the only way I can get better at what I am trying to do. 
 

PS! NO power tools were used for this project. All toos used, except for the sanding paper and a Japanese ryoba saw, are shown in the pictures. This was done partly because the handle material did not allow for the use of power tools and because I wanted to see if it could be done in a proper way without the use of powertools. It took more time, but I did not heat up the materials at all, witch will reduce the possibilities for cracks and warping.

22 Oct 2011

Honyaki Gyuto 240mm refurbishment

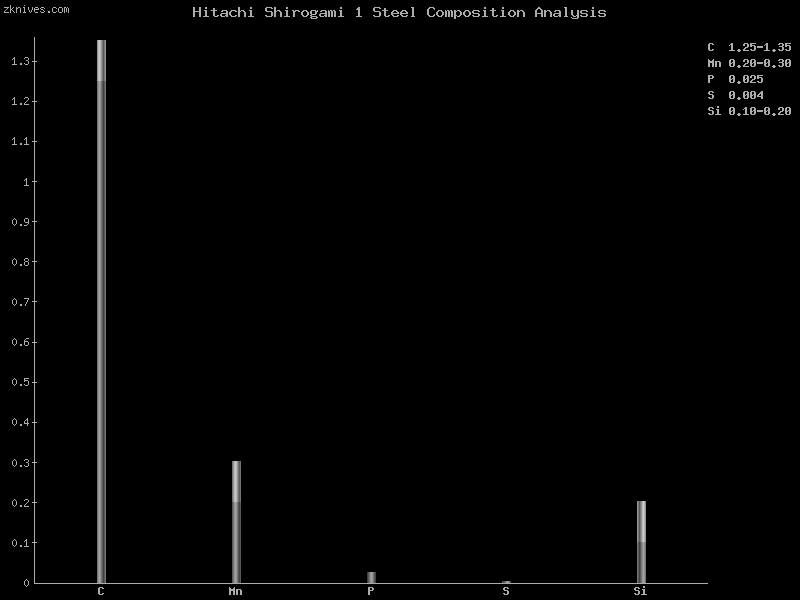
I got this gyuto blade a while ago. It is a 240mm honyaki blade, made from Shiro-ko #3 steel and it is oil quenched. Shiro-ko #3 is very rarely seen used in knives. It is identical to Shiro-ko #1 except it has 0.8%C instead of 1.3%C in Shiro-ko#1. It is thus a very delicate blade with exceptional capabilities regarding hardness and ability to take an ultra sharp edge. As the toughness of the steel is low, it is a blade for the finer work in the kitchen where an exceptionally sharp and a wear resistance edge is required. From the two charts below you can see the striking similarity between the Shiro-ko #3 and the Shiro-ko #1. If anything the Shiro-ko #3 appears to be an even purer steel than the #1.

Steel composition chart for Shiro-ko #1 (from zknives.com)

Steel composition chart for Shiro-ko #3 (from zknives.com)


The blade is originally an OEM blade made in Seki, Japan. Rumors has it that two previous owners/ knife makers has thinned and reshaped the blade on a belt grinder, thus removing the kanji, but both makers finally abandoned it for unknown reasons. Finally it ended up at my friend Øivind's house and as Øivind didn't seem too keen on the blade either, he traded it with me for a new handle on one of his new knives. Hopefully he won't regret that too severly when he sees the finished knife.

The blade didn't look like much when I got it, but I needed a project and anticipated there could be quite some potential in this blade, so I gladly accepted the challenge.

The grind marks were quite pronounced and I didn't like the profile of the kissaki so the first thing I did was to reshape the tip by lifting it a little bit. That balanced the blade and made the profile more to my liking.

You can see the very pronounced grind  marks. Hamon just visible.
The next thing was to polish the blade and rounding the choil and spine. That shoud prove to be a longer and more work intensive project than I first expected. I started out with some pieces of old synthetic stones. #220, #700, and #1000. Then I switched to Japanese natural finger stones. First Iyoto, then Aka pin and finally uchigumori. The steel in this blade is exceptionally wear resistant, so the process from #220 to the final polish took me around 25 hrs and wore down a lot of stones and finger tips. After this long and bloody process the finish on the blade looked like this. When I saw it I instantly forgot my sore fingers. It was a beauty of  a blade! Maybe just because it was now thoroughly baptized in my own blood.
A beautiful  wavy hamon on the polished blade. I just love my JNAT fingerstones.
So, I had this beautiful honyaki gyuto blade on my hands. Now what? It really deserved a nice handle and saya. I had just gotten in some beautiful redwood burl luthier wood and I had a couple of very nice stabilized redwood burl blocks from Burl Source in my knife shop. I didn't take any WIP pics of the handle and saya making as my camera was in another location at the time. I hope the pictures of the finished project speaks for itself.
When I got the raw blade and saw the grind marks from the belt grinder I was afraid that the heat treat might be destroyed. When grinding down the blade I realized that the heat treat was very much intact, and the first sharpening sessions on the finished knife have resulted in an exceptional edge. I now have this beautiful honyaki gyuto in my collection. Thanks to Øivind who traded me the blade and thanks to Mark at Burl Source for his exceptional handle materials. They are a joy to work with.

16 May 2011

Pimp My Knife! - Victorinox refurbishment project

I was discussing good bread knives with my friend Øyvind, and he told me he was planning to order a Güede. I told him that the Victorinox would probably be a better choice and a lot more bang for his buck than this pimped up Güede bread slicer.

As it was, Øyvind already had the Victorinox in question, but he believed it was to old and to ugly looking compared to the rest of his magnificent collection. He then came up with a cool suggestion. I could do a rehandle on his Victorinox. A "Pimp My Knife" project.

The Victorinox is a mid-end blade, higly commercialized and not exactly an eye-catcher. No matter its humble pedigree, it is a blade that is actually one of the very best in what it is designed to do. It is a long time favourite amongst European chefs, and I doubt that you will find a professional kitchen in Europe without at least one of these knives. It is called "The world's best bread knife", and as far as cutting bread or cakes, I have not come across any knife that does it better.

To cut a long story short...
The blade and handle sure had some issues that needed fixing, so I accepted Øyvind's challenge to "pimp" his Victorinox. The starting point was a bit depressing looking, and I sure wondered what I could do to the knife to make it shine again.


First task was to get the old, cracked handle off without damaging the blade. Drilling out the rivets, which were aluminum, was easily done. At this stage I also sharpened the blade on the back side with a #1200 Aluminum oxide stone to bring out a fresh serrated edge. This grit made it fairly sharp while keeping the toothiness required to cut bread and especially crust effectively. I would later remove the scratches when satin polishing the blade.


Next up was to find a nice piece of wood to fit as the new handle. I wanted to keep the semi-hidden tang from the original handle, so I needed a block rather than scales for this one. I know Øyvind and he is a lover of curly and burly woods. I happened to have one that was both curly and burly, and it was Norwegian as well. A nice stabilized block of exhibition grade Masur birchwood.

I wanted to make a handle that had a little more belly and palm swell than the original handle, but still keep the light feel of the knife and its grip-friendlyness to both large and small hands. I thus made a rather highly contoured shape with a good palm swell but with narrower grip towards the blade.


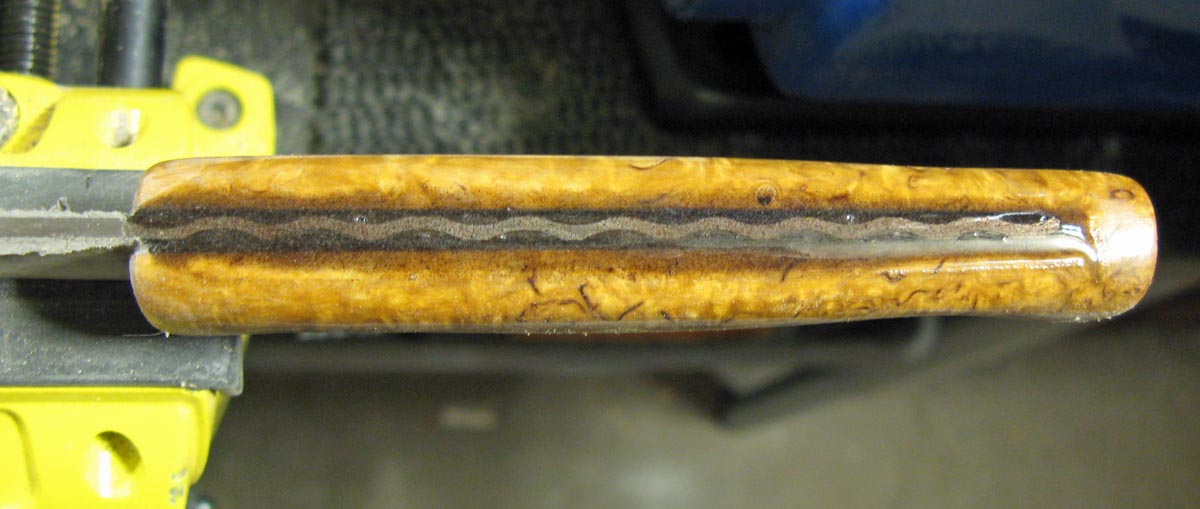
I was wondering what to to to make the knife a little more special looking. After all this was a "Pimp My Knife" project. A knife I had seen on an exhibition a few weeks earlier gave me the idea. Fileworking the spine in the handle. So I started out experimenting on how this could be done as easy and consistent as possible. I ended up using my high power Dremel with an extention cord and a small sanding drum with a #120 grit aluminum oxide paper. This worked like a charm!


Next up was to attach the blade to its new handle and align everything. I sanded out a little extra space in the slot for the tang to fit a couple of black fiber spacers to give a better contrast for the file worked spine.


To finish the handle I used #220, #400, #600, #1200 and #2000 sanding paper followed by a light wood buff on the wood and a green metal buff for the spine and the pins. I also fitted a nice mosaic pin to give it that final "Pimped" look. I gave the blade a nice satin finish with a #1200 fibercloth doped with aoto powder, giving the blade back the as-new finish.


This Victorinox has been officially DarkHOeK Pimped!
Thanks for reading.